Table of Contents
- What At-Home Microdermabrasion Kits Actually Do
- At-Home Kits vs. Professional Treatments: The Real Difference
- The Best At-Home Microdermabrasion Kits Compared
- How to Use a Microdermabrasion Machine Safely
- How Often to Do Microdermabrasion at Home
- Side Effects of DIY Microdermabrasion and Who Should Skip It
- Long-Term Skin Barrier Health and Smart Device Integration
- Final Verdict: Are They Worth Your Money?
- Frequently Asked Questions
Last Updated: September 7, 2026
What At-Home Microdermabrasion Kits Actually Do
At-home microdermabrasion kits are handheld devices that physically exfoliate the outermost layer of dead skin cells using either a diamond-tipped wand or a vacuum suction mechanism. The goal is to mimic professional treatments, which dermatologists use to improve skin texture, reduce fine lines, and address dullness and hyperpigmentation. The question we hear most often is whether these devices actually justify the price tag.
The honest answer is yes, but with important caveats. These kits work by targeting the stratum corneum, the very top layer of the epidermis. Removing that layer of dead skin cells leaves fresher skin underneath and encourages cell turnover, improving texture and radiance over time while helping serums and moisturizers absorb more effectively.
At-Home Kits vs. Professional Treatments: The Real Difference
The gap between a $300 home device and a $200-per-session spa treatment comes down to power, precision, and risk. Professional machines use stronger vacuum suction and more abrasive tips, which can reach deeper into the skin and produce more dramatic results in a single session. Home devices are designed to be gentler, which means you will need more sessions to see comparable results.
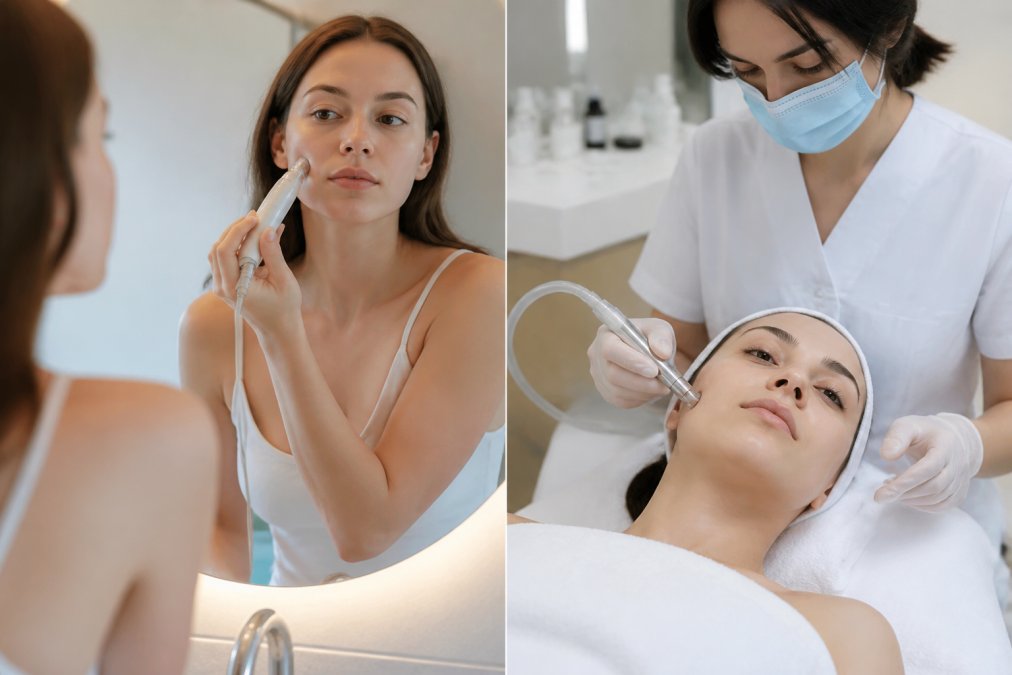
The other difference is accountability. A licensed esthetician has been trained to recognize skin types that should not receive microdermabrasion, such as those with active acne, rosacea, or compromised skin barriers. At home, that judgment call is entirely on you. If you have a condition like active acne or rosacea, the suction and abrasion can cause inflammation and post-inflammatory hyperpigmentation, leaving you worse off than when you started. American Academy of Dermatology guidance on microdermabrasion notes that the procedure is not suitable for everyone, and this applies just as much to DIY devices as it does to professional treatments.
The Best At-Home Microdermabrasion Kits Compared
No single device works for every skin type. The table below summarizes key differences, but the real differentiators are long-term costs and the skin types each device suits best.
PMD Personal Microderm Elite Pro
The PMD Personal Microderm Elite Pro is a customizable option, featuring a patented spinning disc technology paired with variable vacuum suction. It allows control over both the exfoliation speed and the suction intensity, which makes it possible to dial in a setting that suits skin sensitivity. It comes with multiple disc sizes so you can treat both your face and body, and the rechargeable battery means no cords to wrestle with during your routine.
This is a device designed to last. The tradeoff is a higher price point, so it is best for users who want a professional-grade tool and plan to use it consistently. The replaceable discs are a recurring cost, roughly $20 for a pack of six, but they are less expensive than the filter replacements required by some competitors.
Trophy Skin MicrodermMD
For beginners, the Trophy Skin MicrodermMD uses a diamond-tip wand and features an auto-mode with a built-in LED screen that guides you through each step of the treatment. With five suction levels, you can start low and gradually increase intensity as your skin adjusts.
The included magnifying mirror helps you see exactly what you are doing. The main drawback is ongoing cost: filter packs run about $15 to $25, and depending on use frequency, you may need to swap them every four to six weeks. Over a year, that adds $180 to $300 to the total cost of ownership, a factor many reviews gloss over.
NuBrilliance Microdermabrasion System
The NuBrilliance Microdermabrasion System is a budget-friendly option. It uses genuine diamond-encrusted tips combined with adjustable vacuum levels to remove dead skin cells and stimulate collagen production. Users typically notice a smoother skin texture and a reduction in the appearance of fine lines after consistent use.
The compact design makes it easy to store, but it can be too abrasive if overused. The diamond tips are permanent, you clean them with the included brush, making this the lowest long-term cost option on this list.
Kendall Microdermabrasion Machine
The Kendall Microdermabrasion Machine is a professional-style desktop unit built for heavy-duty use. It features a high-powered vacuum motor, multiple diamond tips of varying coarseness, and a stainless steel wand that feels substantial in your hand. The built-in air filtration system is a nice touch that keeps the device clean.
This is a powerful option, which is both its strength and its limitation. Advanced users who want spa-level suction will find it suitable, but the bulk and power make it less forgiving for beginners, with a steeper learning curve for controlling pressure and glide speed.
| Device | Starting Price | Recurring Cost | Key Feature | Best For |
|---|---|---|---|---|
| PMD Personal Microderm Elite Pro | $299 | Disc replacements (~$20 per pack) | Variable suction and disc sizes | Face and body treatment |
| Trophy Skin MicrodermMD | $299 | Filter replacements ($15-$25 per pack) | LED-guided auto-mode | Beginners needing instruction |
| NuBrilliance Microdermabrasion System | $199 | None (permanent tips) | Diamond tips, compact | Budget-conscious users |
| Kendall Microdermabrasion Machine | $350 | None (permanent tips) | High-powered vacuum motor | Advanced users |
How to Use a Microdermabrasion Machine Safely
Using a microdermabrasion machine safely starts with preparation. Wash your face with a gentle cleanser and pat it completely dry. Your skin must be free of makeup, oils, and active ingredients like retinol or acids, which can increase sensitivity and make the treatment more abrasive.
Pre-Treatment Checklist
Before you even turn on the device, run through this checklist to avoid the most common mistakes:
- Cleanse thoroughly. Use a non-foaming, sulfate-free cleanser to remove all traces of makeup, sunscreen, and sebum. Residual product on the skin can clog the device tip and cause uneven suction.
- Skip active ingredients for 48 hours. If you use retinol, tretinoin, or prescription-strength acids, stop them at least two days before your session. These ingredients thin the stratum corneum, making it more vulnerable to physical abrasion.
- Patch test first. On a small area of your jawline, run the device at the lowest setting for 10 seconds. Wait 24 hours. If you see more than mild redness or any broken capillaries, do not proceed with a full-face treatment.
- Check the device. Inspect the diamond tip or discs for chips, cracks, or debris. A damaged tip can cause microtears instead of even exfoliation.
The Technique That Protects Your Skin
Hold the device at a 90-degree angle and move it in short, upward strokes. Do not linger in one spot or press hard; the suction should glide, not pull. Keep the treatment to about two minutes for your entire face, spending less time on delicate areas like the cheeks and forehead.
The most common error is treating the skin like a surface to be scrubbed. Instead, think of the device as a vacuum that glides. If you see the skin being pulled into a fold or crease, you are using too much suction or moving too slowly. FDA guidance on home-use aesthetic devices emphasizes that consumers should follow manufacturer instructions closely, as improper use of these devices can lead to skin injury.
Post-Treatment Protocol
What you do after the treatment matters as much as the treatment itself. For the first 24 hours:
- Apply a barrier-repair moisturizer. Look for ceramides, niacinamide, or squalane. Avoid anything with fragrance or essential oils.
- Do not layer active serums. Skip vitamin C, alpha-hydroxy acids, and retinol for at least 24 hours. Your skin's permeability is temporarily increased, and these ingredients can cause stinging and inflammation.
- Wear sunscreen the next morning. Freshly exfoliated skin is more susceptible to UV damage. Use a broad-spectrum SPF 30 or higher.
- Avoid makeup for a few hours. Give your skin time to settle before applying foundation or powder.
What to Do If Something Goes Wrong
If you experience pain, burning, or visible bruising during the treatment, stop immediately. Apply a cool compress and a gentle, fragrance-free moisturizer. Do not apply any active ingredients or attempt another session until the skin has fully healed, which can take five to seven days. If you notice persistent redness, swelling, or signs of infection like oozing or crusting, consult a dermatologist rather than trying to self-treat.
How Often to Do Microdermabrasion at Home
Most manufacturers recommend using an at-home microdermabrasion device once every seven to ten days, giving your skin barrier time to recover. Over-exfoliating is the fastest way to compromise your skin's protective layer, leading to increased sensitivity, dryness, and breakouts.
A simple routine: microdermabrasion on day one, then focus on hydration and barrier repair for the following six days. Use a gentle moisturizer with ceramides or hyaluronic acid after each treatment. If your skin feels tight or looks red for more than a few hours, extend the gap between sessions to two weeks.
Side Effects of DIY Microdermabrasion and Who Should Skip It
Side effects are typically mild when the device is used correctly. Temporary redness, slight swelling, and a tingling sensation are normal for a few hours after treatment. However, improper use can lead to microtears, excessive inflammation, and post-inflammatory hyperpigmentation, particularly in darker skin tones.
You should skip microdermabrasion entirely if you have active acne, rosacea, eczema, psoriasis, or any open wounds on your face. The suction can spread bacteria and worsen these conditions. Also avoid treating areas with active cold sores, as the friction can trigger an outbreak. If you are using prescription retinoids like tretinoin, your skin is already exfoliated at a cellular level, and adding physical abrasion can cause severe irritation. Cleveland Clinic overview of microdermabrasion risks recommends consulting a dermatologist before starting any exfoliation treatment if you have a history of skin conditions.
Long-Term Skin Barrier Health and Smart Device Integration
The long-term success of at-home microdermabrasion depends entirely on protecting your skin barrier between sessions. The stratum corneum is your skin's first line of defense against bacteria, irritants, and moisture loss. Repeatedly stripping it without recovery time leads to a compromised barrier, manifesting as chronic dryness, redness, and increased sensitivity.
A balanced approach integrates microdermabrasion with your existing routine rather than replacing it. Exfoliate first, then apply a hydrating serum while your skin is most receptive. Avoid combining the treatment with other strong actives like vitamin C or alpha-hydroxy acids on the same day, maximizing serum absorption without overwhelming your skin.
Final Verdict: Are They Worth Your Money?
At-home microdermabrasion kits are worth the investment for people with healthy skin who want to improve texture and dullness without the recurring cost of spa visits. Devices costing between $199 and $350 pay for themselves after a handful of professional sessions, provided you use them consistently and correctly.
They are not worth it if you have sensitive skin, active breakouts, or a condition like rosacea. In those cases, the risk of inflammation and hyperpigmentation outweighs the potential benefits. If you are still deciding, start with a mid-priced device like the NuBrilliance system to test whether your skin tolerates the treatment before committing to a higher-end model. For a broader selection of personal care devices and wellness tools, Hutch's Beauty Boutique carries a range of options designed to fit different skin types and budgets. Our catalog makes it easy to find a device that matches your routine, all in one place. Search our site to see what fits your needs.
Frequently Asked Questions
Does home microdermabrasion really work?
Yes, at-home microdermabrasion kits can work, but the results are more subtle than professional treatments. They physically exfoliate the stratum corneum to remove dead skin cells, which improves skin texture and radiance. Consistent use is key. Devices like the PMD or Trophy Skin can smooth fine lines and boost serum absorption, but they cannot match the suction power of a clinical machine. For noticeable collagen production and deep resurfacing, professional sessions are more effective. For maintenance between spa visits, a quality home kit is a practical option.
What are the side effects of DIY microdermabrasion?
The most common side effects of DIY microdermabrasion are temporary redness, skin sensitivity, and dryness. Overuse or pressing too hard can cause microtears in the skin barrier, leading to inflammation and post-inflammatory hyperpigmentation, especially on darker skin tones. If you have active acne, rosacea, or eczema, the vacuum suction and abrasive tip can worsen these conditions. Always do a patch test first and follow the manufacturer's instructions on suction intensity. Stop using the device immediately if you feel pain or see broken skin.
How often should you use an at-home microdermabrasion tool?
Most manufacturers recommend using an at-home microdermabrasion tool once every 7 to 10 days. This gives your skin enough time to rebuild its protective barrier and complete a cycle of cell turnover. Using it more frequently, such as every day, strips away healthy skin cells and leads to increased sensitivity, redness, and a compromised dermal layer. Start with the lowest suction intensity and the gentlest diamond tip until you know how your skin reacts. Adjust the frequency based on your skin type; sensitive skin may need a longer break between sessions.
Do dermatologists recommend microdermabrasion kits for home use?
Dermatologists generally support the concept of at-home microdermabrasion but with caution. They recommend it for people with dull skin, mild sun damage, or clogged pores who want a non-invasive exfoliation option. However, they advise against it for individuals with active acne, rosacea, or very sensitive skin, as the abrasive action can trigger inflammation. Look for devices with adjustable suction power and diamond tips rather than crystal systems, which can be messier and more abrasive. When used correctly, dermatologist-approved home kits can be a safe supplement to a skincare routine.


